Photography, Editing, and Organization
Make art, photograph it, edit it, and organize it...Learning Objectives
- Begin the never ending job of photographing your work and organizing your digital images.
- Post to Instagram using the #artisapractice hashtag (show that you’re making art!).
- Commit to a website and show that you’ve started building.
Advice from Last Semester's Students
- “DSLRs are available for check out in the library.”
- “Working 1:1 with Madara can help if you don’t have experience with photo editing.”
- “Photoshop is on all of the computers in the lab.”
- “Keep your work in something like Google Drive.”
When it comes to Instagram, I have a few tips to make it most effective as an artist:
- Follow other artists. Create a newsfeed of artists who create work you aspire to make or simply work that you enjoy. The more you see other artists at work on their craft, the more you’ll be inspired to work yourself. You’ll also begin to see how much art regularly practicing artists really make and if you follow the #wip hashtag, you’ll get to see inside the processes of other artists. Aim to follow 50-100 new artists in the next two weeks.
- Use more than one hashtag. Do research by looking for types of art you’re interested in: #linocut #ceramicdecals #oilpainting #digitalart #contemporarycraft #contemporarysculpture etc. When you find art that’s in your sweet spot, use those tags when you post your work. Look at the hashtags being used by your favorite artists. Aim to use 10-15 new hashtags in the coming weeks.
- Ask artists questions about their work. Think about how it makes you feel when somone asks you about your work. If you want to engage with other artists, there’s no better way than to express curiosity. Aim for 2-3 questions each week.
This is just advice…I’m not counting any of these things and grading you. If you don’t want Instagram to be a time waster, think of it as a community you belong to, and use it that way!
Introduction
Photographing your work on a routine and frequent basis is one of the best habits you can develop early on. I don’t have high quality photos of approximately 50% of my early work because I didn’t develop good documentation habits early on! Do yourself a favor and work on this aspect of your professional career.
Count on this being 25-30% of your life as an artist. Grants, awards, fellowships, publications, and solo exhibitions are highly dependent on your ability to document your work in its best light.
Photographing and Editing Your Work
**If you have trouble with any of this week’s assignments, PLEASE let me know. I’m happy to meet with any of my students for 1 on 1 tutorials!! I mean it. Email me, text me, call me, put a note in Classroom. Visit with me before you get frustrated!
The importance of photographing your work…
A professional career in the visual arts starts with making quality work. But coming in a close second to that is photographing and organizing your work in a way that makes sense. If you want to apply for grants and residencies, solo and group exhibits, build your website, or sell your work, you must have high quality, organized photos! Few, if any, galleries want you to submit slides or other hard media for submissions. The vast majority (99%) of submissions take place online, which means you need good images at your fingertips. The same is true for selling work as well as generally promoting yourself as a professional. Even if you hope to work with agents, they’ll want to see quality images of your work before they’re willing to represent you.
I’m not a professional photographer. Many of you may know more than I do about digital cameras. I do my best to get my work on a flat surface, light my work as well as possible from multiple directions, and edit the image in Photoshop in a way that makes the image look its best while staying true to the work. However, the very best way to photograph 2D work is to get it under a high resolution scanner if you can. For 3D works, think about photographing your work in a light tent. Lots of low-cost options are available. If your work IS photography, then of course, there is no scanning or lighting you need to worry about other than what you do for the image itself.
I’ve included some videos below that offer good advice for a number of photography, lighting, and editing issues. This week, I’m asking you to photograph, edit, and organize at least 2 pieces. Watch the videos you find relevant and scroll to read about organization of your files.
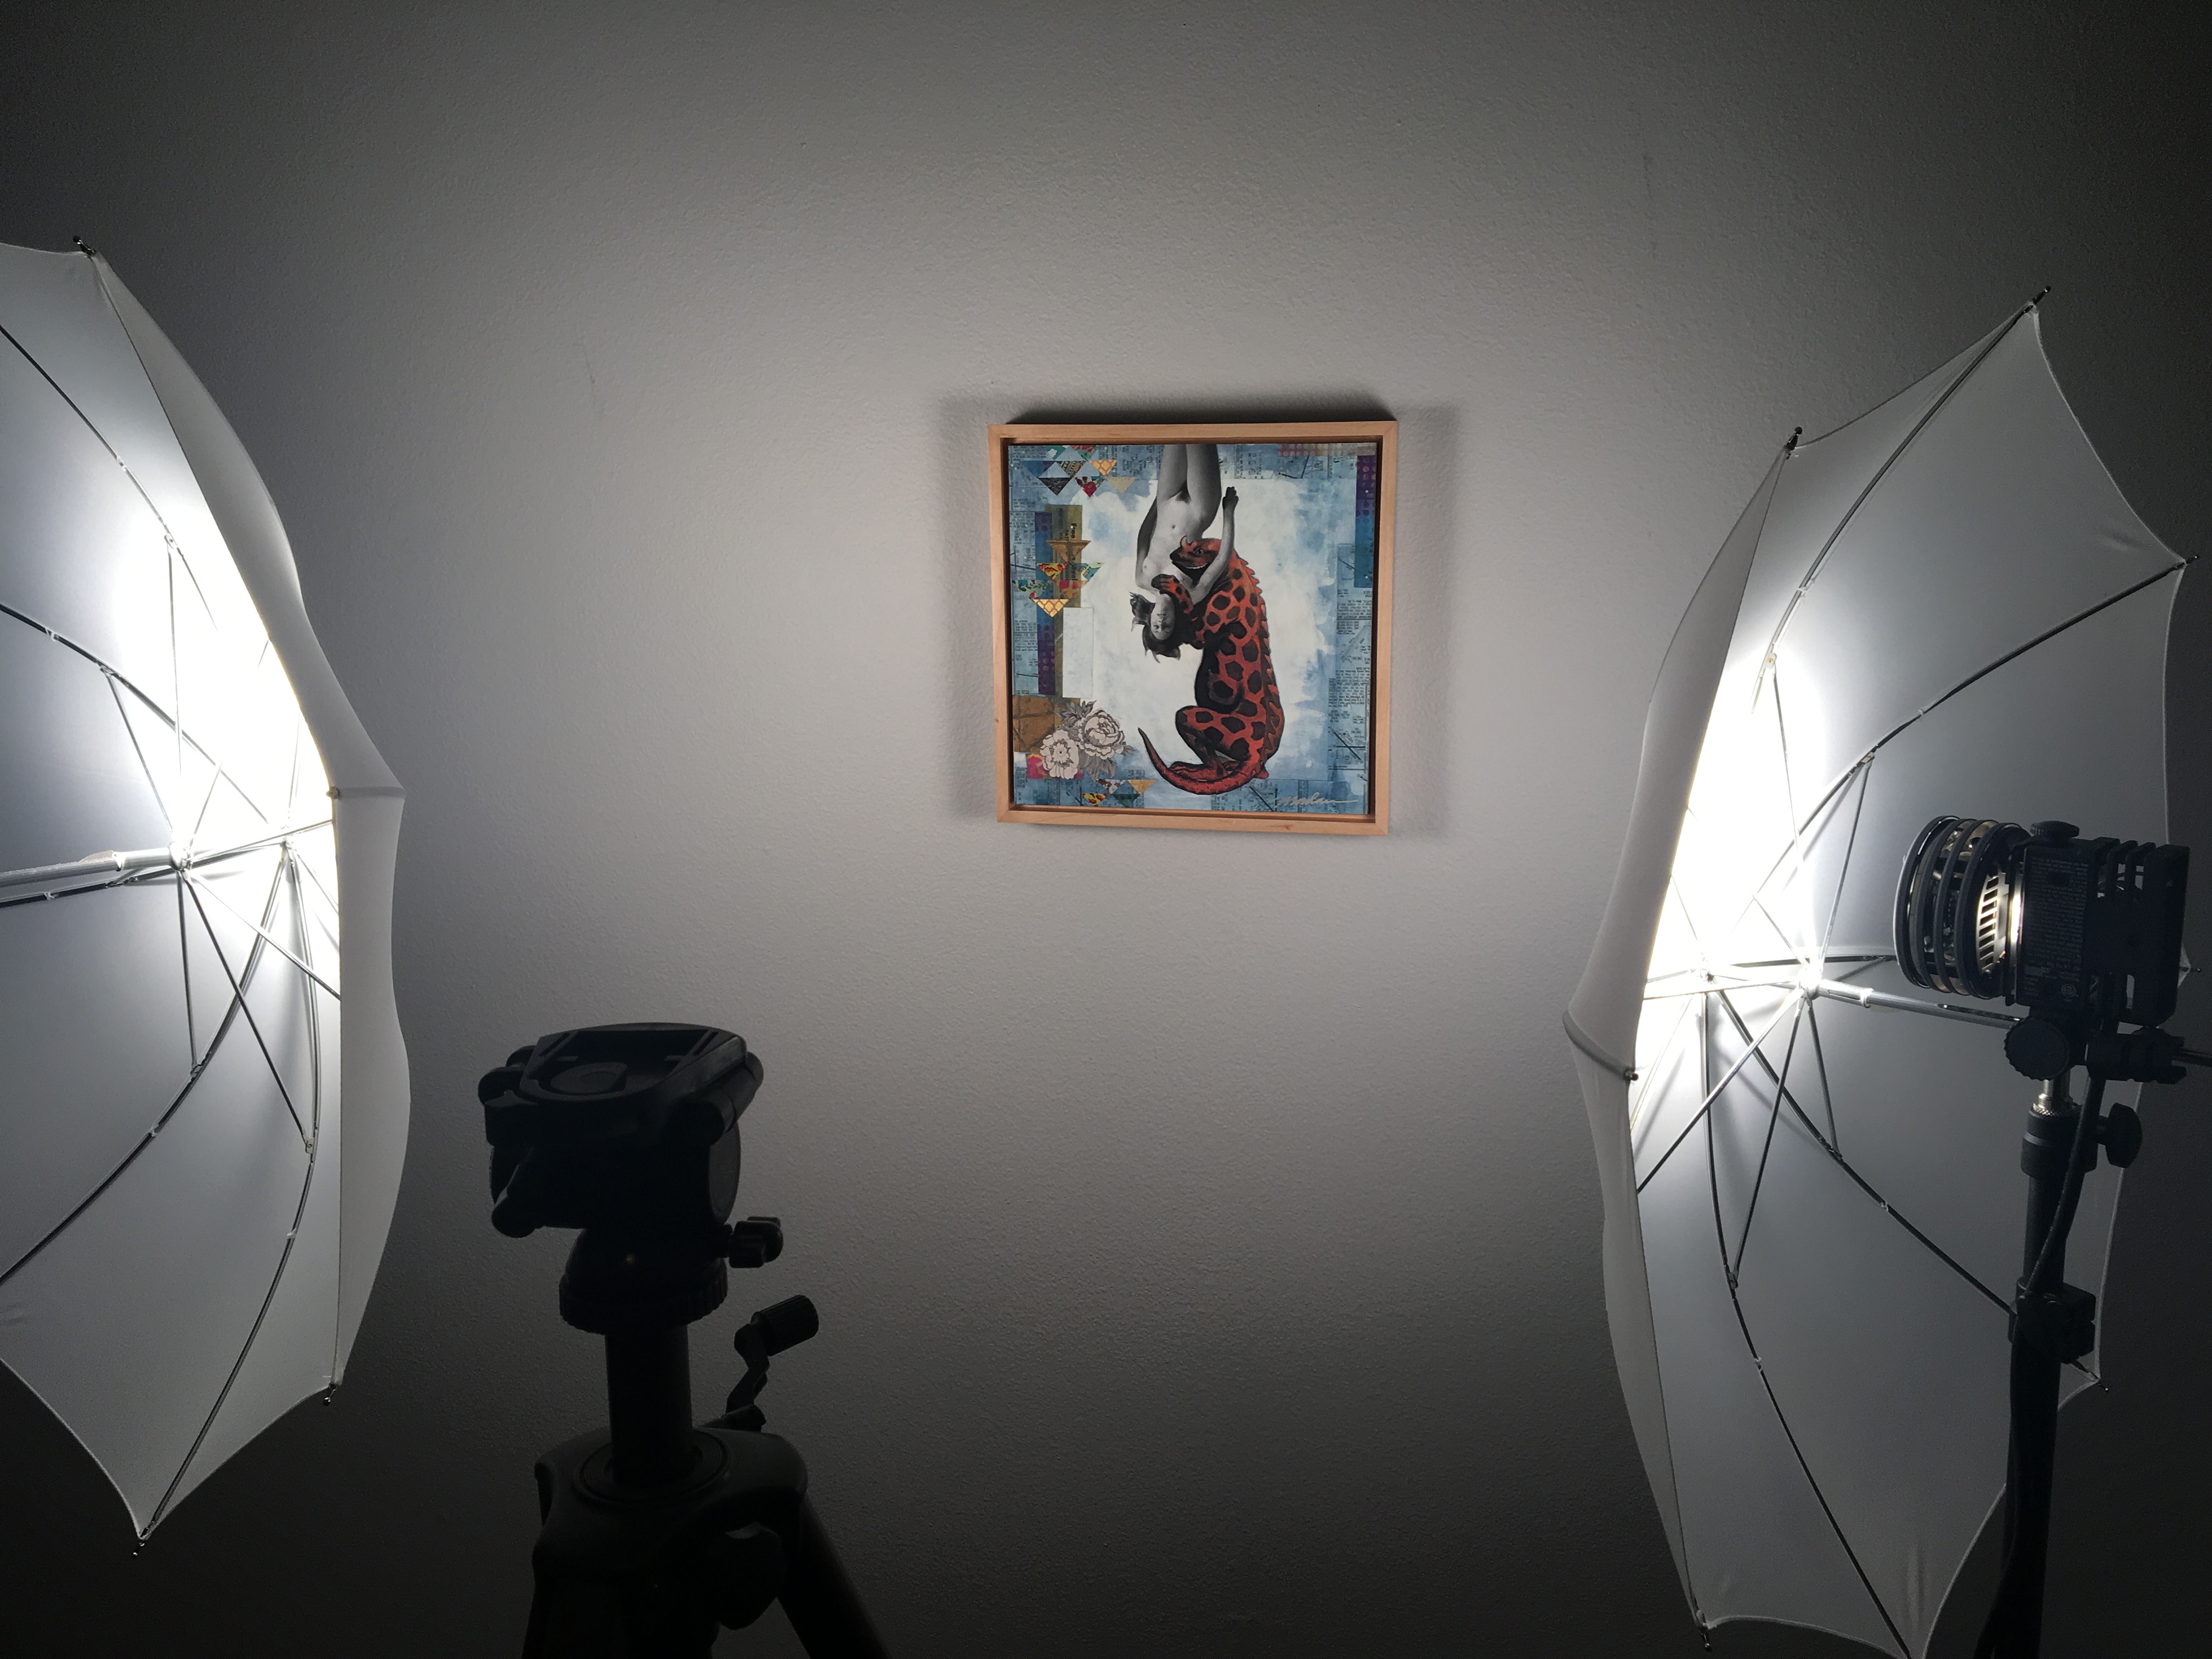
The photo setup I have in my spare bedroom.
Helpful Videos
These are great, low-cost ways to deal with not having a $10,000 flatbed scanner or $5,000 digital camera…
How to Photograph Your Art
Including stitching multiple images together to make a high resolution photo and adjust lighting.
But All I Have is My Phone Camera…
You can still take decent photos…
Clean Up Your Drawing in Photoshop
For those of you who want drawings in your portfolio.
Organizing Your Images
The importance of organizing your work…
Once you’ve photographed and edited your images, all that remains is to organize your work.
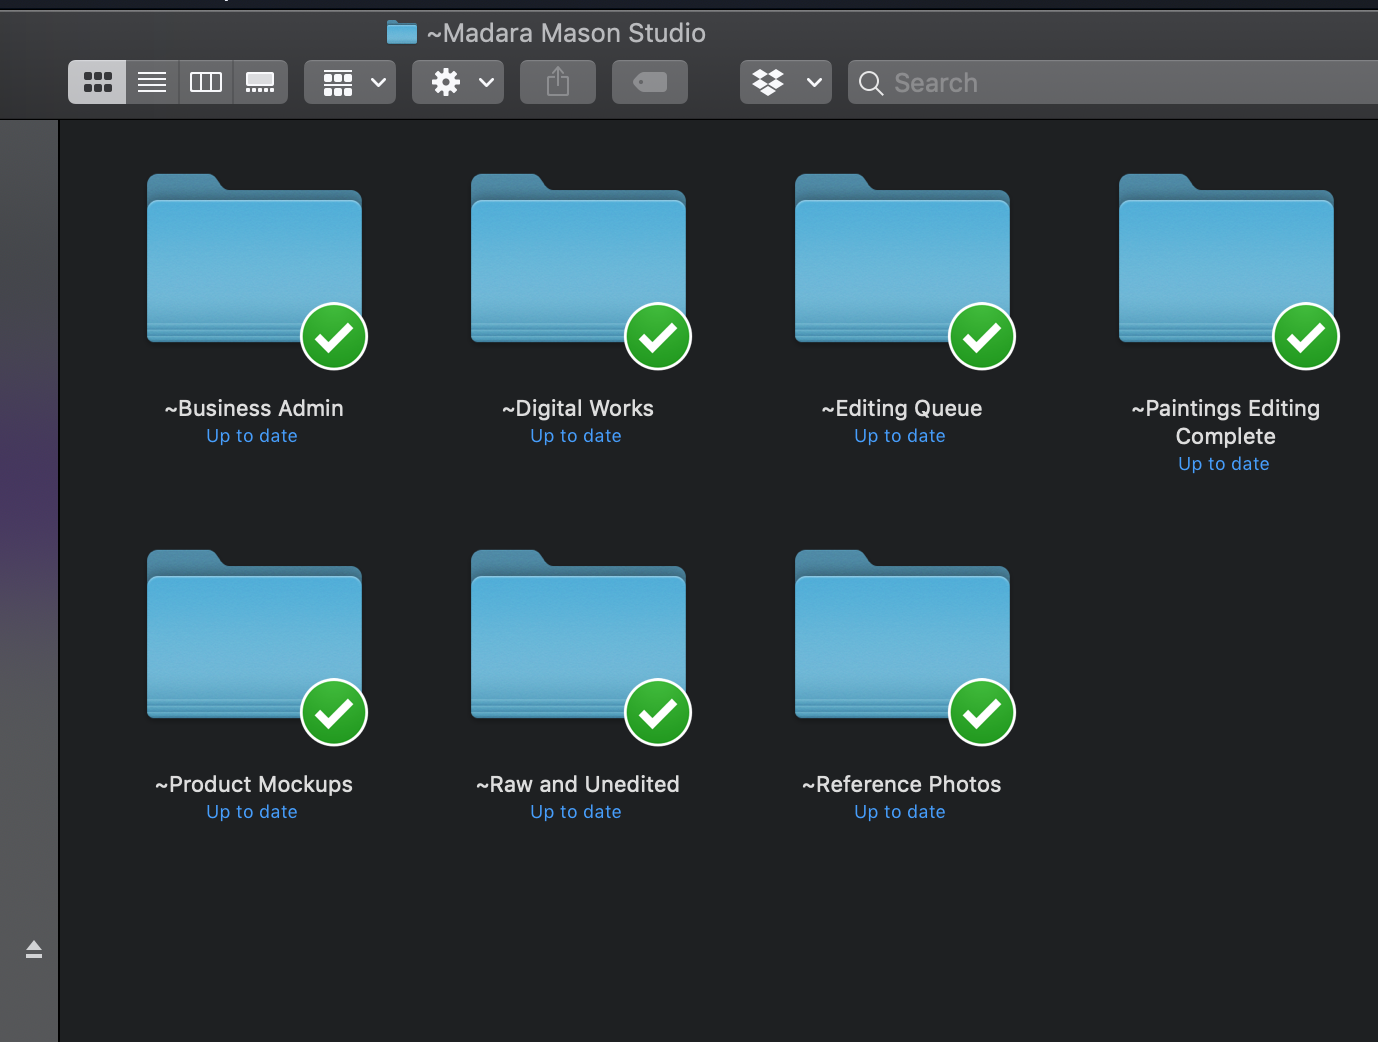
- Put your images in cloud storage. As a student at UAF, you have access to unlimited storage in Google Drive. I store my images in Dropbox and pay for a large amount of space. I deduct the cost of their service on my taxes. Every single semester a student ignores this advice and loses months (and occasionally years) of work when their hard drive is lost, destroyed in a house fire, or stolen along with a backpack.
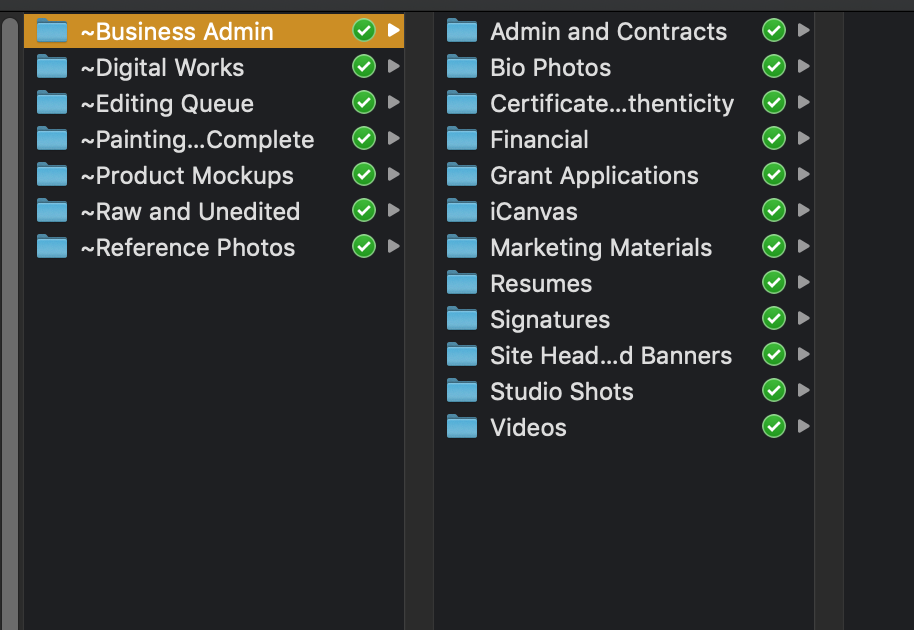
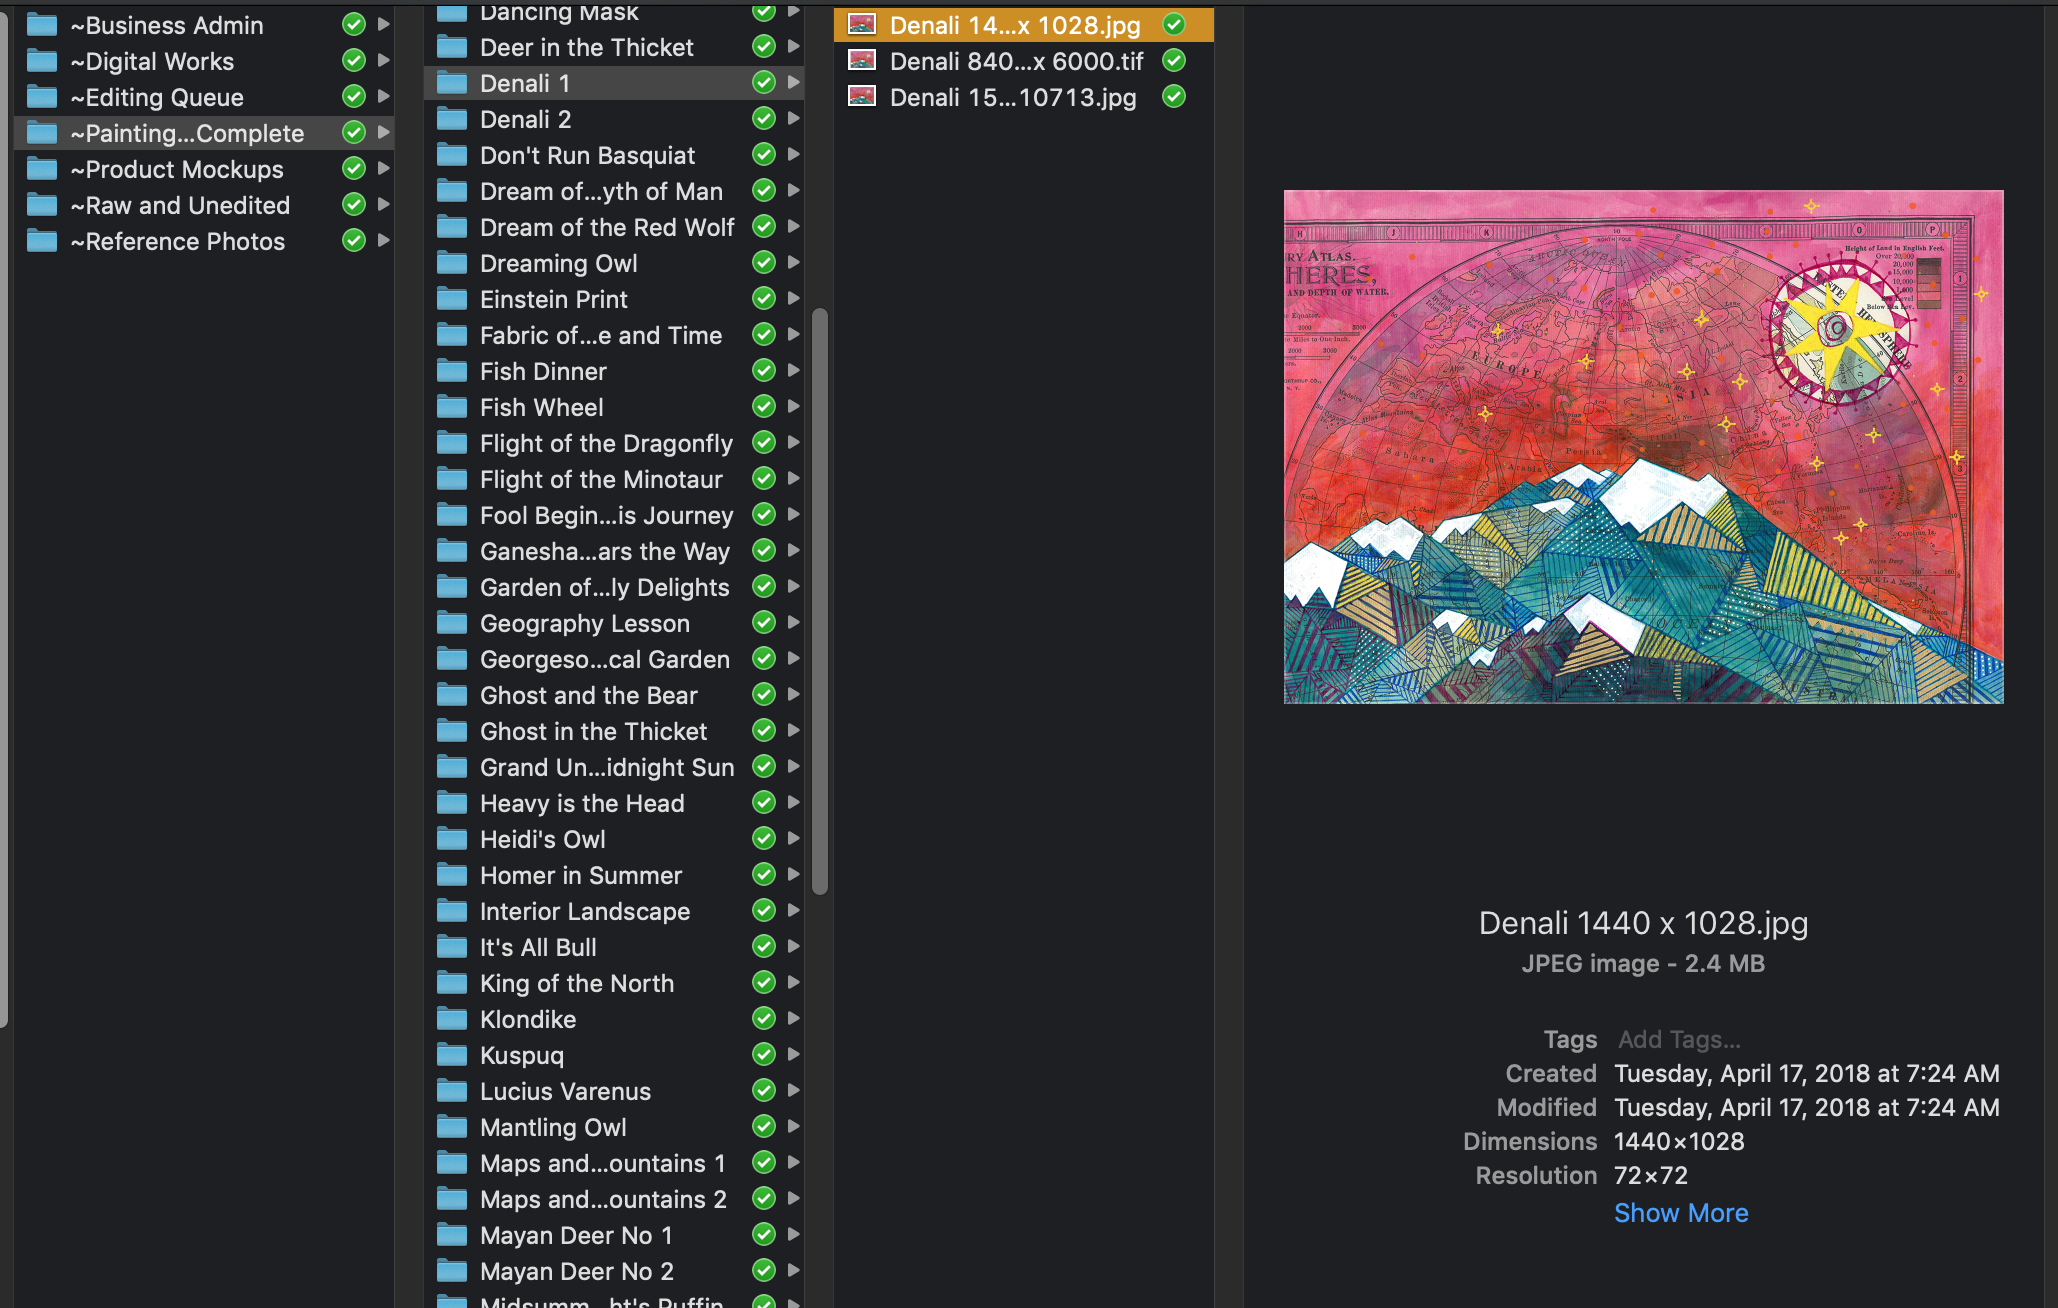
- Create a folder for each image (recommended, but not required). Once you have a large amount of work, having a folder for each image or each series makes sense.
- Keep 3 versions of each image: the original, a high-res (300dpi) version, and a web-ready (72 dpi) image for your website and submissions.
I’ve added a couple of things below to help you understand image types and resolution matters.
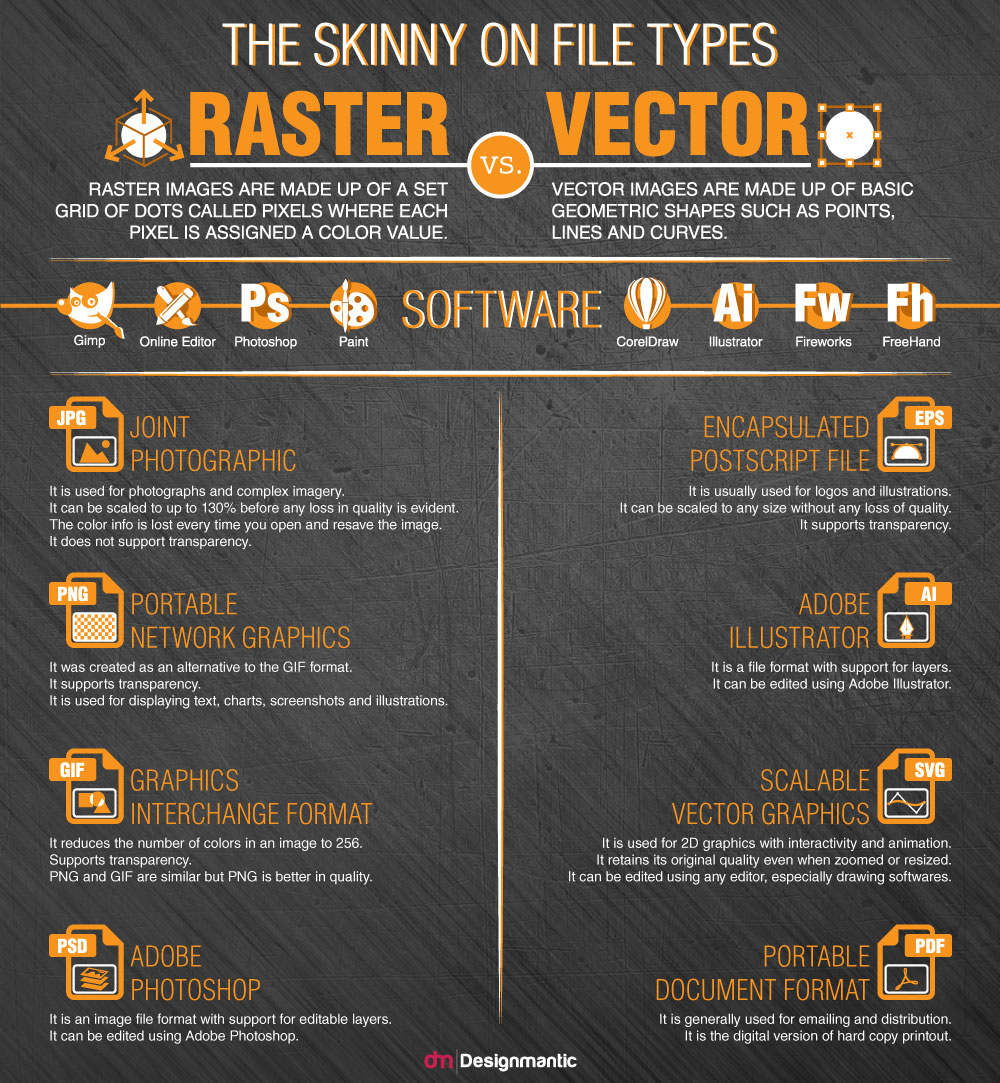
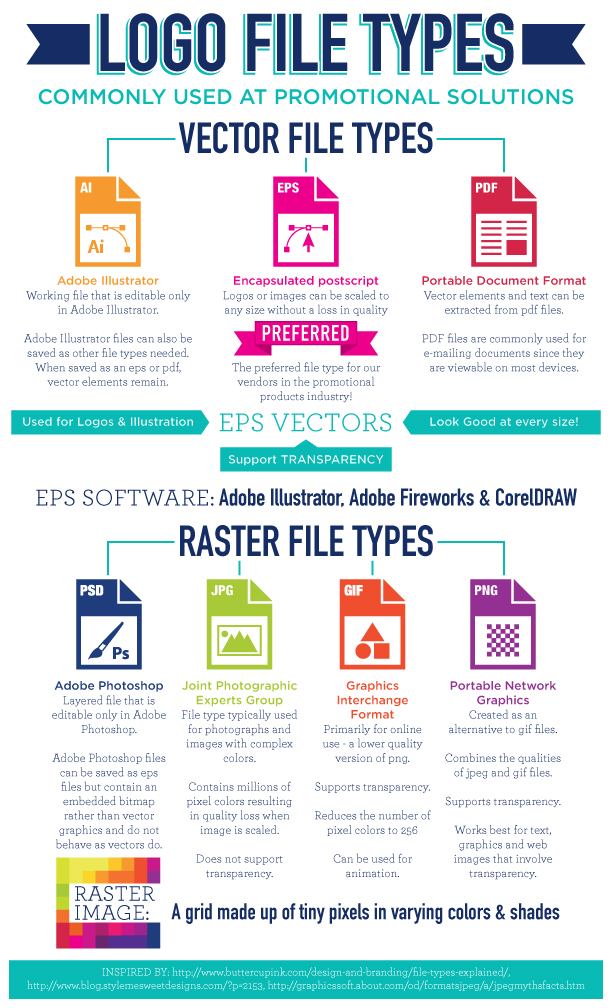
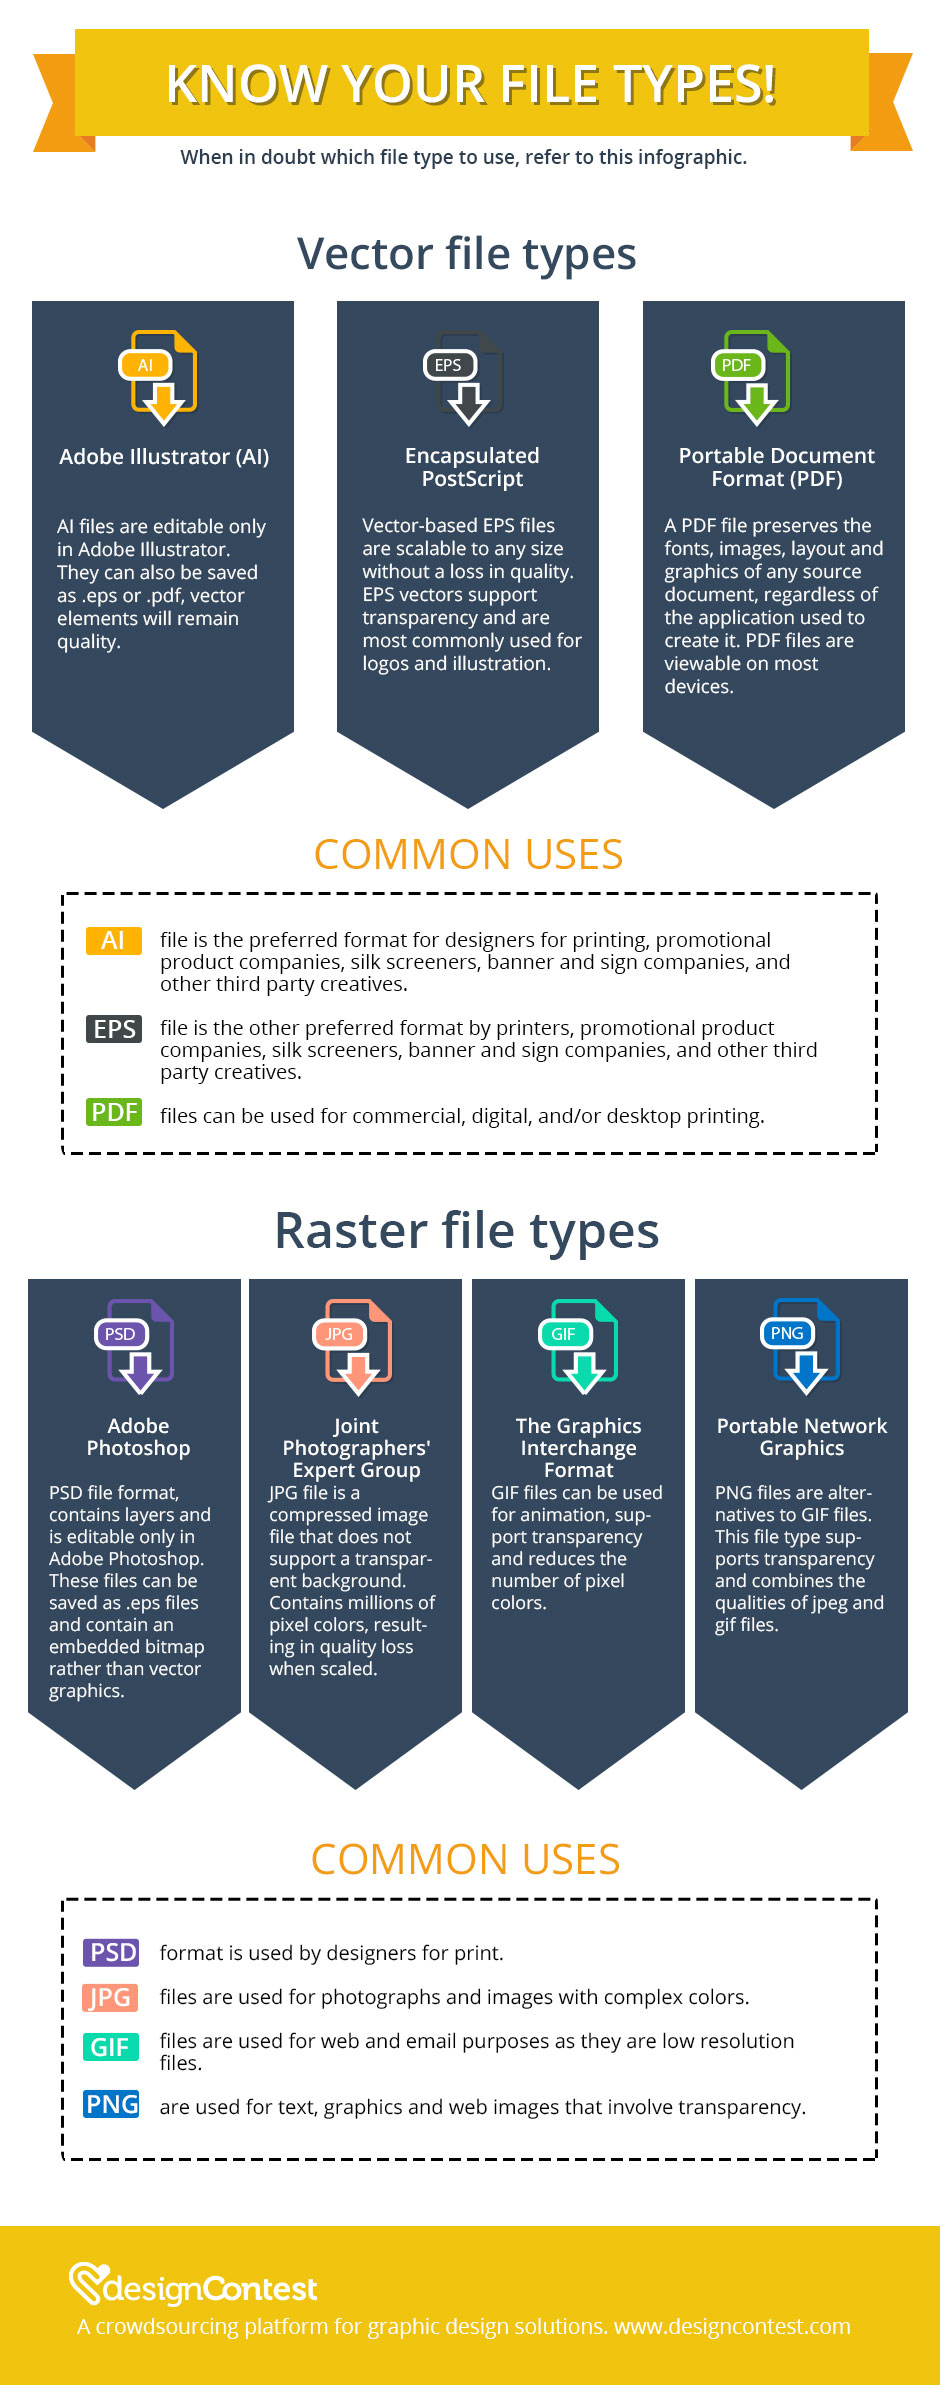
Filetypes
Click on the “+” icon for each of the titles below to see the large infographic. Make sure you understand what the differences are between, for example, an .svg file and a .png. You should also know the difference between vector and raster graphics.
Principles of Design
Via the J. Paul Getty Museum. This is a downloadable PDF. I’ve included the content below as well.
Principles of Design
“The principles of design describe the ways that artists use the elements of art in a work of art.
Balance is the distribution of the visual weight of objects, colors, texture, and space. If the design was a scale, these elements should be balanced to make a design feel stable. In symmetrical balance, the elements used on one side of the design are similar to those on the other side; in asymmetrical balance, the sides are different but still look balanced. In radial balance, the elements are arranged around a central point and may be similar.
Emphasis is the part of the design that catches the viewer’s attention. Usually the artist will make one area stand out by contrasting it with other areas. The area could be different in size, color, texture, shape, etc.
Movement is the path the viewer’s eye takes through the work of art, often to focal areas. Such movement can be directed along lines, edges, shape, and color within the work of art.
Pattern is the repeating of an object or symbol all over the work of art.
Repetition works with pattern to make the work of art seem active. The repetition of elements of design creates unity within the work of art.
Proportion is the feeling of unity created when all parts (sizes, amounts, or number) relate well with each other. When drawing the human figure, proportion can refer to the size of the head compared to the rest of the body.
Rhythm is created when one or more elements of design are used repeatedly to create a feeling of organized movement. Rhythm creates a mood like music or dancing. To keep rhythm exciting and active, variety is essential.
Variety is the use of several elements of design to hold the viewer’s attention and to guide the viewer’s eye through and around the work of art.
Unity is the feeling of harmony between all parts of the work of art, which creates a sense of completeness.”
via The J. Paul Getty Museum at the Getty Center
Filetypes via Designmantic
Filetypes via Igniting Business

Filetypes via Buttercup Ink
Filetypes via Design Contest
Two Slideshows on Design Principles
These slideshows cover the basic principles of design using images to illustrate concepts.
CRITICAL INFORMATION
Image Size (how many pixels along each edge?) vs Image Resolution (dpi, ppi, or how many pizels in a square inch?)
My File Organization Method
Horizons:
A few things you should be prepping for and working on.
Consistent posting here is key for the following reasons:
- Frequent posting obligations means you’re actively engaging in making work.
- Engaging with others on Instagram helps you build a community of supportive artists.
- Collecting images of your process and work that is “in process” is just as valuable as documenting finished work.
Photography and Editing
Get into the habit of documenting your work now! You have two images due this week, and every week after this I’ll have you turning in a few more. A minimum of 10 are due by the end of the semester. If you really want to be a practicing professional artist, however, you should really have more than that!
Airtable
Create your Airtable account this week.
Cafe and Submissions
Here are some deadlines that are on my own personal submission list:
Website
You’ll be required to commit to a website platform this week. Make sure you’ve made a choice that works for you but one that can help you demonstrate the things I outlined above.
Your primary options are:
- Wix
- Squarespace
- Google Sites
- Adobe Portfolio (I’m fairly certain you need an Adobe CC subscription to use this one)
- WordPress